Showing posts with label tutorials. Show all posts

Tuesday, January 17, 2012

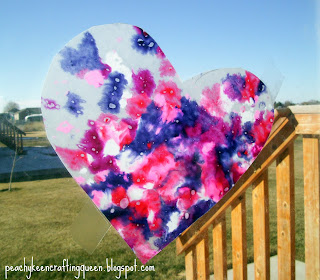
Crayon Valentine-Heart Sun Catchers


Aren't they adorable? This is such a fun activity to do with the kids and most likely you already have all the supplies you'll need laying around your house! Perfect! Love that!
These cute sun catchers would work with any holiday really. We usually do it for St. Patrick's Day too and cut clovers instead of hearts. :)

Step 1: Shave up all those old and broken, red, pink, white, purple crayons you have laying around the house. Everybody has some right? :) I just used a sharp knife to make my shavings.

Step 2: Place a piece of wax paper over a brown paper bag. Let your kids spread crayon shavings over the wax paper, using whatever color combo they'd like.


Step 3: Place another piece of wax paper on top of your shavings, then place another brown paper bag on top of the wax paper. Iron on top of the brown paper bag with a warm iron until your crayon shavings begin to melt and spread.
Wa-la! You've got yourself a fancy, colorful, Valentine sun catcher.


Step 4: Let them cool for just a minute or two, then let your kids get busy drawing and cutting heart shapes out of them. My kids especially LOVE this part!


Step 5: Tape all your cutesy Valentine colored hearts to the windows and watch them gleam in the sunshine!


Beautiful, just beautiful!

Now, go gather up all those old, un-wanted crayons and get shaving!  :)

Thursday, December 8, 2011

Christmas Shirts

I'm a sucker for cutesie holiday shirts and as long as my kids are still young enough to wear them, they're gonna! :)

I made these fun Christmas shirts for my little kiddies this year. Who doesn't love a good holiday shirt, right?! They were so simple to make and took no time at all!

First we'll start with my Little Lady's ruffle tree shirt.
You'll need a plain white t-shirt and Christmas material. You could use as many different Christmas fabrics as you'd like but I found these two fabrics that went perfect together so I just stuck with two alternating ruffles.
Next I cut a 3" strip of each material for the ruffles. Sew the strips together, then open the seam and iron flat down the center. {see pic below}
Next step, the ruffles. After you've back stitched a few stitches to start on your ruffle piece, stop sewing with the needle still down in the material to hold it secure. Then, lift the presser foot, scrunch the material a little from the sides then put the presser foot back down and sew the scrunched section. Repeat this until your whole strip is ruffled, back stitching at the end.
Next, decide how long you want your tree "branches" on your shirt and cut your ruffle stripes to size--be very careful not to pull too hard on the ruffles once their cut. Then, back tack a few stitches at the ends of each "branch" so your ruffles don't come apart.
Place your finished ruffles on your shirt and pin them in place. When they're nice and secure where you want them, sew the ruffles on the shirt with your sewing machine. And that's it, you're done! Isn't it so cute?
I made a cute ruffle flower clip for my daughters hair with the extra ruffles I had using my trusty glue gun and an alligator clip. So cute!

Now, for the cute Snowman shirts I followed a way easy tutorial on Brassy Apple. I've already had so many comments on these cute shirts and better yet, my boys love their Snowman shirts!

Happy Holiday sewing!!

Tuesday, June 14, 2011

Necktie Treat Bag for Father's Day

There are so many fun ideas out there in the crafting world that have to do with
Father's Day and neckties.
Classic combo, right? :)

I got to thinkin'. . .
Here is my spin on the famous duo. . .


The Necktie Treat Bag! Wahoo!
Just fill these little cuties with your Dad's, Hubster's or Father-in-laws favorite treats and he'll be one happy Daddy!

If you use leftover/scrap fabric like I did from my couch pillows, plus already have plenty of spools of ribbon like I do, then doesn't that make this project pretty much free???
{minus the candy you shove in it of course}
Yes.  Yes I think does!  haha!  ...something to think about anyway. . .  :)

Okay, so this is how I did it:
First, draw and cut out a necktie template on card stock.
*Note:  when you're drawing your template, keep in mind that you'll be stuffing it with candy so you'll want your tie to be big enough and especially wide enough to shove candy down into.* 


Then, trace your template onto your fabric and cut out your necktie pieces. You'll need two necktie pieces for each bag you make.


Next, for the handle of the bag, cut a long strip of material {mine was a 18.5"x3" strip}, fold it in half long ways, sew down the open seam, turn it right side out and iron it flat. Easy as 1, 2, 3!


Next, decide the design/pattern of your tie and cut your ribbon to size. Then, pin and sew your ribbon in place.


After your ribbons are sewn in place, pin and sew your handle into place.


If you want to add anything to the back of your bag now is the time to do it. {My daughter wanted to help so she cut out a fabulous heart for me to sew on the back just so they would know it was made with love, so cute!} I also sewed a line across the top of the back piece just so it would match with the front piece. Then, pin front and back pieces together.


Now, sew the side seams of your necktie closed, trim the excess ribbon and wa-la!
Simple as that and you've got yourself one nifty necktie treat bag!


So fun, right?


Now, it's not meant to go around your Dad's neck {unless your Dad's head is the size of a two year olds head, then he could put it around his neck :) } but, my littlest fella sure had fun diggin' the candy out while sporting the new necktie!  :) 


These were so fun and simple to make and I know that my Father, the Father of my children and my Father-in-law are going to LOVE them!!

So, go grab some srap material, some ribbon and get to sewin'!  :)


~ Holly ~